Importing Events from an CSV, XML, JSON file
The following steps will guide you through importing events into your website using a CSV, XML, or JSON file with our Import by File system.
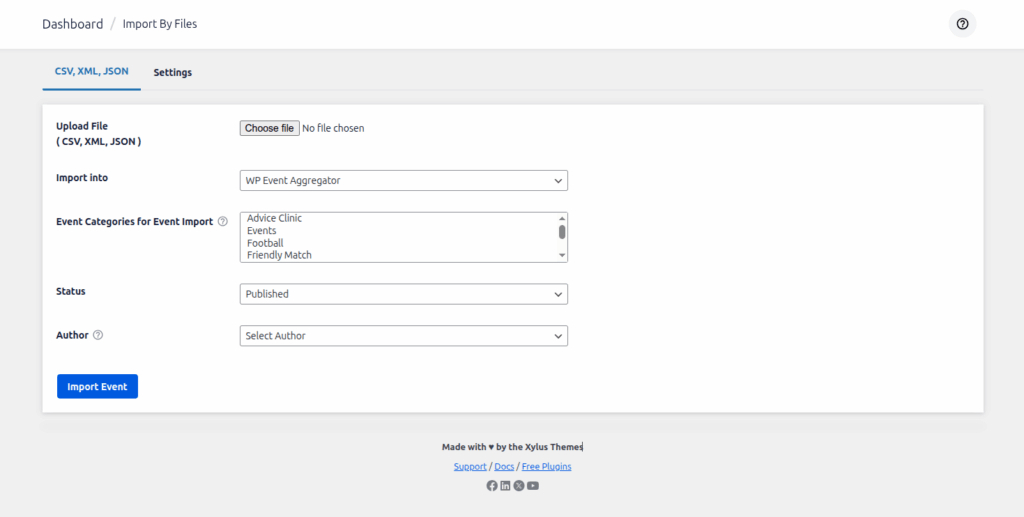
File: Select a CSV, XML, or JSON file to import events. You can either upload a new file from your computer. Once selected, the plugin will process the file and prepare the events for import.
Import Into: You can choose WP Event Aggregator from the drop-down list.
Event Categories for Event Import: You can also assign an Event Category for the imported events. This category will be added in additional to any categories defined by the feed itself.
Status: Before you hit the Import button, you can also set the WordPress status of the events when they are imported:
- Published: The content will be published to your site right away.
- Draft: The content will not be published but available for editing after the import.
- Pending : The content will not be published or a draft, but labeled as being ready for an WordPress editor or administrator to review before it is published.
Author: Select event author for imported events. The default event author is a currently logged-in user.
Once you have everything configured, click the Import button. You will then be taken to the Field Mapping step, where you can map the columns/fields from your CSV, XML, or JSON file to the corresponding event fields in WordPress. The available fields will depend on the plugin you selected in the Import Into option, so you can map your file data directly to that plugin’s event fields.
Map Your Fields
After uploading your CSV, XML, or JSON file and configuring the import options, you will be taken to the Field Mapping step. This section allows you to connect the columns/fields from your uploaded file with the corresponding event fields in WordPress.
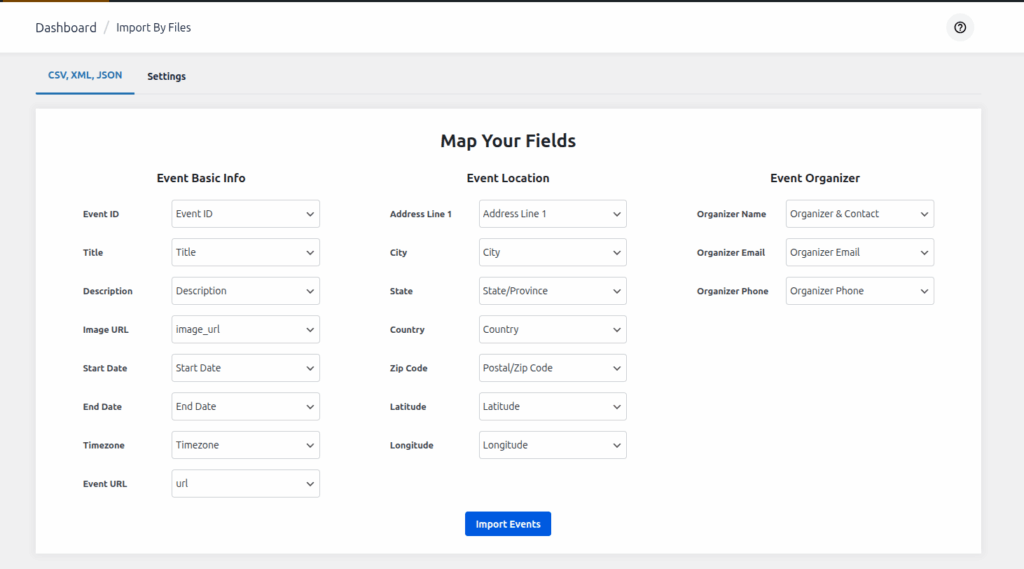
How It Works
- On the left side, you’ll see the list of Event Fields (e.g., Title, Description, Start Date, Venue, Organizer).
- On the right side (dropdowns), you’ll see the columns detected from your uploaded file.
- Use the dropdown menus to map each event field with the correct column from your file.
Example Mappings
- Event Basic Info
- Event ID → Event ID column in your file
- Title → Title column
- Description → Description column
- Image URL → image_url column
- Start Date → Start Date column
- End Date → End Date column
- Timezone → Timezone column
- Event URL → url column
- Event Location
- Address Line 1 → Address Line 1
- City → City
- State → State/Province
- Country → Country
- Zip Code → Postal/Zip Code
- Latitude → Latitude
- Longitude → Longitude
- Event Organizer
- Organizer Name → Organizer’s name
- Organizer Email → Organizer Email
- Organizer Phone → Organizer Phone
Importing Events
Once all fields are mapped:
- Click the Import Events button.
- The plugin will process the file and import all events in bulk.
- Events will be created in your selected events plugin (based on the Import Into option chosen earlier).
Notes
- You do not need to map every field; only the essential fields (e.g., Title, Start Date, End Date) are required.
- Unmapped fields will simply be ignored during import.
- The available mapping fields depend on the events plugin selected under the Import Into option.